- See more at: http://tutorialgeek.blogspot.ca/2010/11/how-to-change-your-blogger-domain-url.html#sthash.JOLPbG90.dpuf my beauty full adventure - do not use: glitter
Showing posts with label glitter. Show all posts

Friday, June 21, 2013

NOTD & Review: Rainbow Honey Pinkie Promise

Recently, I have been introduced to a new nail polish brand called Rainbow Honey. I received a full size polish in the colour Pinkie Promise in my May Wantable Box. Seeing as I had never heard of this brand before I wanted to research a bit about them, and here is what I found.
 
"Rainbow Honey was born out of a love for colour and a penchant for creativity. To create Rainbow Honey, Dee, its founder and Chief Designer, brought together her background in the sciences and her experience in the fashion industry, resulting in unique, colourful and well-formulated custom blended nail lacquers.
 
Our products are designed and made in the United States of America, always free of Formaldehyde, Toluene, and Dibutyl Phthalate (the “big 3”), and with ingredients that have never been tested on animals.
 
Our love for colour drives our passion for great and beautiful products, outstanding design, extreme attention to detail, and superb customer service. These values are at the core of everything we do.
 
The Rainbow Honey brand has already received rave reviews from customers all over the U.S. as well as Canada, Australia, Singapore, U.K., France, and continues to reach new audiences every day."
 
Pinkie Promise is part of the Equestria Collection, and comes in both a 15mL and 7mL bottle. The bottles retail for $10 and $5 respectively, and based on the quality of this polish I firmly believe that they are worth every penny. Pinkie Promise  is described as a "fun and shimmery pink base filled with hex and tinsel glitter in magenta, light blue, and gold - this polish calls for a party!"
It took only two coats for this polish to be completely opaque, and it lasted about four days before I had some tip wear and minor chipping. This polish was also true to its description, it really was like a party on my nails. Like I said in my review of my Wantable Box, it is like a unicorn puked all over my nails...or Ke$ha, we all know she loves her glitter.
 
The only negative I had with this polish was that the bottle got goopy really quick while I was painting my nails. The polish dries fairly quickly, and all of the glitter clogs up the opening of the bottle. I had to clean it before I closed it, or the polish would have dried and sealed the bottle. Other than that though I was extremely happy with this polish, and would not hesitate to purchase more in the future.
 
If you are interested in trying out Rainbow Honey polishes they are launching a new collection soon and have a good promo going on right now. All US & Canadian customers will receive a FREE polish and FREE shipping on all orders over $50.


Disclaimer: Products were purchased by me for personal use. I was not required to review this product, nor am I being compensated for it. All opinions and thoughts are completely honest and my own. Information in italics is sited straight from Rainbow Honey's website and I take no credit for it.


Monday, June 17, 2013

NOTD: On a Holographic Trip

After seeing Wet n Wild's polish On a Trip  all over YouTube I knew I had to make it part of my collection. Purple is my favourite colour, and I love a glossy cream polish. This polish was gorgeous on its own, but I thought I would kick it up a notch by adding some glitter. Specifically, I wanted to use the BA STAR Holographic Glitter that I reviewed a few weeks ago. The glitter is not something I will use on my eyes all that often, and I couldn't wait to try it on my nails.

I simply painted two coats of On a Trip then put on my top coat. Once that was dry, I taped off part of my nails and added another layer of of top coat. While it was still wet I dipped my finger into the pot of glitter. I tapped off the excess glitter and them added a top coat over the glitter, and removed the tape. I was so happy with how it turned out, and cant wait to try it out again. The process was fairly messy but totally worth it.

On the nails the glitter doesn't look quite as holographic, but it is still super glittery, which makes me happy. On a Trip is opaque in two coats and such a gorgeous purple. In pictures it tends to photograph more on the blue side, so I added a blurry picture of just the purple on my nails that is more true to its actual colour.


Saturday, June 8, 2013

NOTD: My 1st Jelly Sandwich Manicure

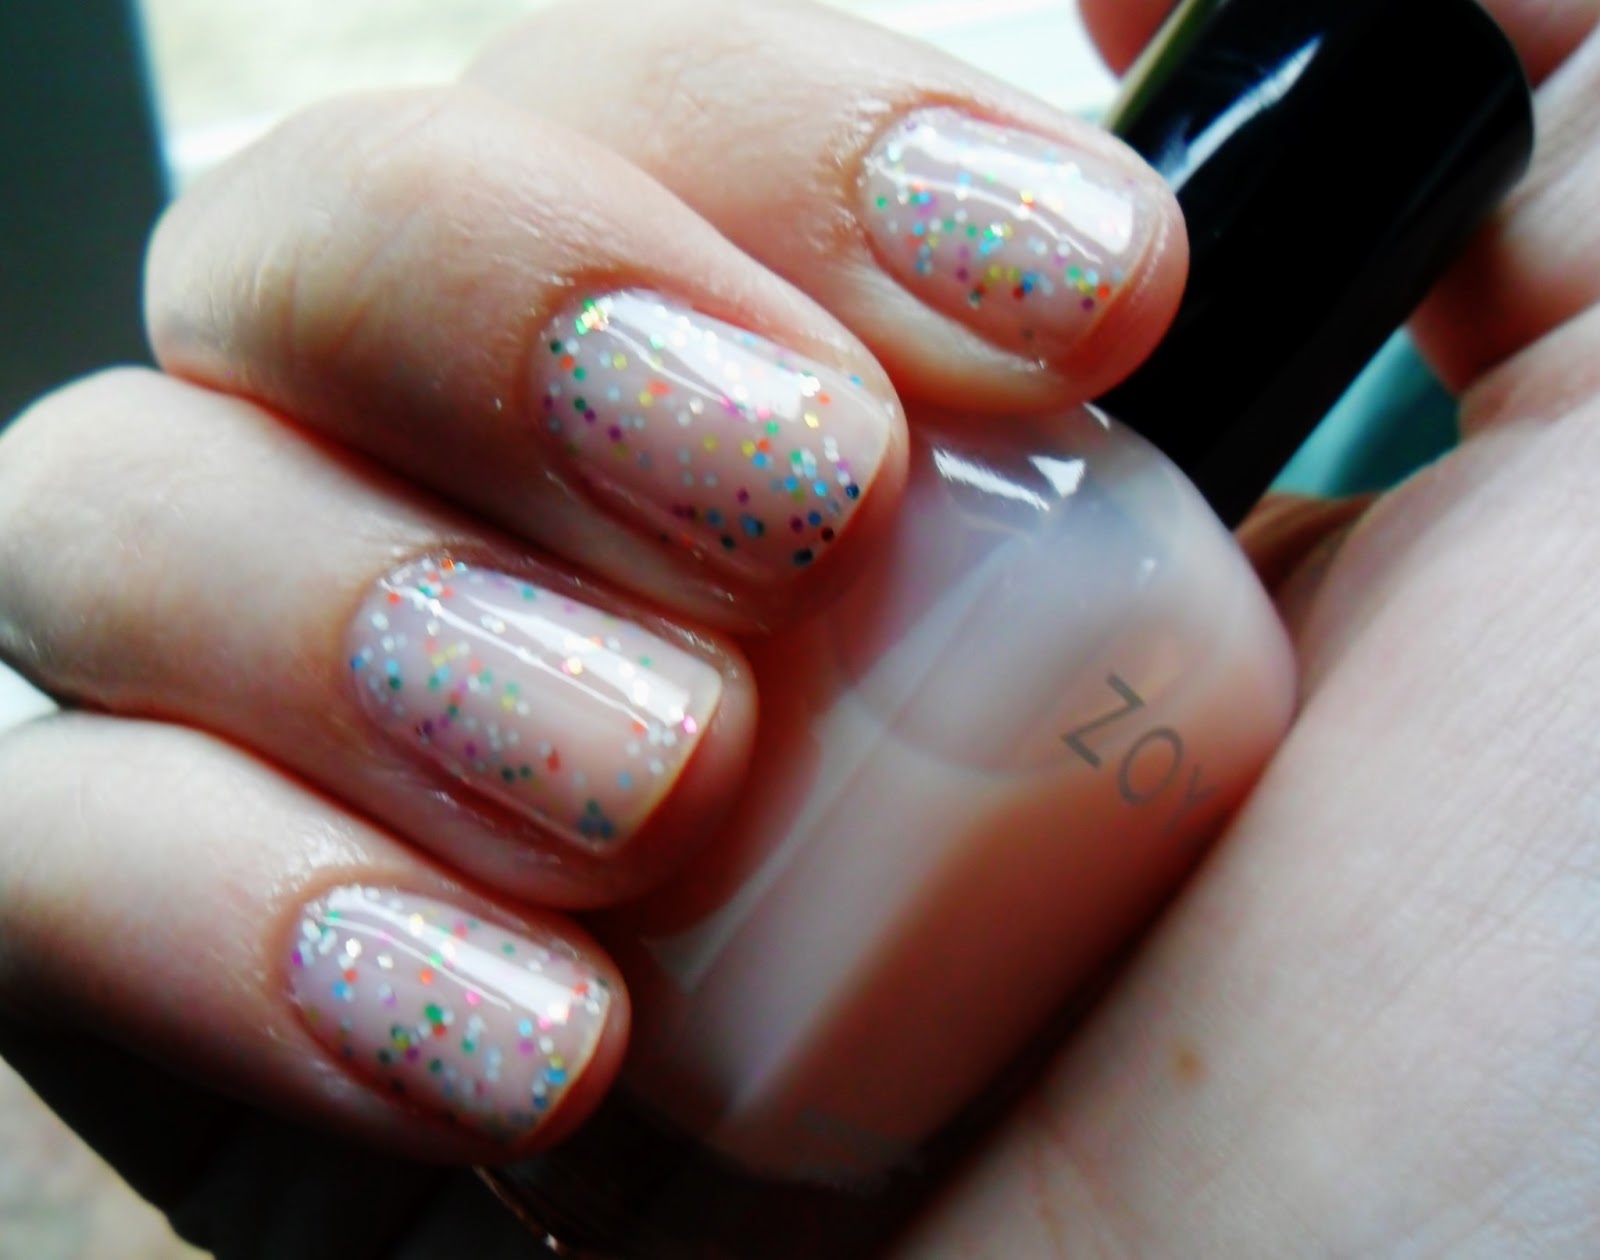
I'm not sure if jelly sandwich manicures are still "in", but I'm used to being the last girl at the trend party, so here is my attempt at it. To complete this manicure you need a jelly polish that is sheer, even after a few coats, for the bread. And a glitter polish for the filling. I chose to use Zoya's Loretta and a unnamed Cynthia Rowley polish that I used in a past nail of the day. If you would like to see that firework inspired manicure click here!

I started with a base coat, let that dry, and then put down one coat of Loretta. After I let that dry for a few minutes, I put a fair amount of glitter down on each nail. Again, once that dried I put two more coats of Loretta on top. Loretta is a extremely sheer, light, milky pink. It would be perfect for a French manicure, and it worked fairly well for this manicure. I could still see the white tips of my nails underneath, but I was pretty happy with how it turned out. With a top coat I had no chipping for about 4-5 days, and by that time I was bored with the look and moved on to a new colour.

What do you think of the jelly sandwich look?

Monday, June 3, 2013

Review: BA STAR Holo Glitter

Hey ladies! Today's post will be a review of BA STAR's holographic glitter and glitter glue. I was sent these products from BA STAR in exchange for a review. I was really impressed by the last products I was sent from BA STAR, so I had high hopes for these. They did not disappoint, so check out the review below.
The glitter glue came in a lip gloss type tube with a doe foot applicator. I didn't find that it had a scent, and although it is white in the tube it goes on pretty clear. It dries fairly quickly, at least I think that it does. It is hard to tell if it is drying or not because the formula isn't very wet, it is more of a cream texture. It holds the glitter fairly well, and isn't overly sticky, so I didn't have to scrub to get it off. I was impressed with this glue and will use it with some of the other glitters I have in the future.
 The glitter is very finely milled, and a little goes a long way. As you can see above in the lid it flashes all colours of the rainbow. It isn't gritty, like other glitters I've tried, so it didn't irritate my skin. I didn't try it on my eye because I am worried about it getting in my eye, but I was impressed by what I did try. I think that it would look really nice in a top coat on my nails. I am going to be trying this soon and if it turns out well I will post it on here.
I kept the one shot out of focus and super zoomed in so that you could see how pretty all the different colours are. My swatching skills were lacking here so the swatch on my hand is kind of sparse. However, to actually get the swatch to be opaque, you would need quite a bit of glitter, more than I would wear on a daily basis. I think putting a light wash of glitter to finish off an eye look would be good for an everyday look. Maybe on New Years I will pack on the glitter and go all out. When I tried to put the glitter from the lid onto my hand with my finger, most of the glitter stayed on my finger. I don't think, with this glitter, you would need much glue, it holds on pretty well on its own.

Overall, I am impressed with this glitter. I cant wait to try it on my nails, and in a makeup look. This little pot is going to last me a really long time, so I cant see myself having to buy more anytime soon. BA STAR has other colours available on their website. The other colours look nice, but I think that the holographic is the most unique.

If you are interested in trying this glitter out, check out the link above. The glitter and glue combo retails for $8.75, however, for my readers BA STAR has offered 50% when you use the code BBGLITZ.
 
Disclaimer: I received these products from BA STAR for free in exchange for a review. I was eligible for this campaign because I am part of BrandBacker. This review was 100% honest and my own thoughts. 

Tuesday, May 28, 2013

May Wantable Makeup Box

Hey ladies! Today I am bringing you another Wantable Makeup Box review. I last reviewed Wantable's subscription service in March, when they were still working on bringing their service to Canada. About two weeks ago they officially "soft launched" in Canada, and gave the first 1000 girls who signed up a free box. I still had to pay for shipping, duties, and taxes; so this box came to just under $15. If you would like to read all about Wantable, their subscription service, and past products, please refer to my first review HERE. This is a very extensive review, with a lot of pictures.

Unlike in March, where I kept my beauty profile very open, I re-did the survey so that I would get a more customized box. I asked for: eyeliner, blush, lip colour, nail polish, lash product, and eye shadow. I asked not to get: brows, highlighter, bronzer, and brushes. Looking back I wish I had asked for brushes and not lash products, but hindsight is 20/20.

This month I received 4 full size products, and one bonus product, with a retail value of $81. I am pleased with what I received, to a point. The colours are not really for me, and I don't know how much use I will get out of them, but it is always nice to try out new things.

I decided not to stay subscribed after this "free" month, because for $50 each month it is too much of a gamble. I would pay $15 a month for what I got, but in my mind I do not think it is worth it for $50. I would rather take that $50 and use it towards things I know I will like and use.

If you would like to sign up for Wantable I would love if you would use my referral link!

Now for a breakdown of the products I received.

Frownies Eye Gels

Retail Value: $0
"Anti-wrinkle treatment for puffy bags under the eyes contains powerful anti-oxidants that help protect your skin. With one 30 minute anti-aging treatment 100% of women testing Frownies eye gels saw a reduction in the appearance of fine lines and dark circles. The weight of the anti-wrinkle patch smooths the under eye area and protects the integrity of the acid mantle and skin. Frownies Eye Gels promote beauty and provide anti-oxidants to fight free radical damage. Natural ingredients help improve the appearance of the skin."

My Thoughts: I am not in the age bracket that needs to use products like this. I will probably give this to my mom to use. I am glad that it was an extra, freebie product and didn't count as one of my main products.

Rainbow Honey Nail Lacquer in Pinkie Promise

Retail Value: $10
"Pinkie Promise is a fun and shimmery pink base filled with hex and tinsel glitter in magenta, light blue, and gold - this polish calls for a party! Designed and made in the United States, always free of formaldehyde, toluene, and dibutyl phthalate, and with ingredients that have never been tested on animals."

My Thoughts: This polish is so me! And, I am really glad I got this one instead of the matte polishes other girls were. This polish looks like a unicorn threw up on my nails. I only needed two coats for it to adequately cover the nail. It is so eye catching, and would be great for a full manicure or accent nail. I may have to look into buying some more from this brand in the future.

Manna Kadar Blush in Tropicana

Retail Value: $19
"Our custom formulated blush offers a special light texture which glides on smoothly and evenly and provides the perfect amount of colour to give your face a health glow."

My Thoughts: This blush is so bright and pigmented! Swatches will be at the end of the post. It is really not a colour I would go for, if I was buying a blush for myself. Even lightly swatched and blended this blush is way bright. It will require a super light hand to apply. I don't know if this will look good with my skin tone, but I am definitely going to try it at least once.

FACE Stockholm Matte Shadow in Lemon

Retail Value: $20
"This gorgeous matte shadow is hyper-pigmented for long lasting colour and velvety smooth for superb blendability."

My Thoughts: I was initially turned off by this colour, but after swatching it, I have changed my mind. This shadow is soft and lightly pigmented. It doesn't really come off as yellow, but more of a beige/neutral tone. I think this will look nice as an all over wash of colour.

FACE Stockholm Luxe Lash

Retail Value: $32
"Lengthen and define with our unique precision Lash Lift mascara brush. The close-cropped bristles are precisely spaced and designed specifically to latch onto and coat each individual lash for maximum height."

My Thoughts: When I first opened this mascara I found it to be a little too creamy for a brand new mascara. I thought it had totally dried up. However, after using it, I noticed that it is just a drier formula. I am not in love with this mascara. First, because it is a brown mascara, and I only use black mascara. And second because it doesn't do much for my lashes.
Right: Manna Kadar Blush; Left: Face Stockholm Eyeshadow

Tuesday, May 21, 2013

NOTD: Revlon Minted & Stunning

I am one of those girls who buy every mint nail polish they see, because, "it's not the same as anything I already own." That was my justification for buying Revlon Minted. This mint polish is more green toned; most of the other polishes in my collection are more blue toned. I also picked up Stunning at the same time because I just couldn't get over how it sparkled. The large glitter flashes all colours of the rainbow, and the smaller silver glitter is constantly glittering. It is very eye catching and I always get a lot of compliments when I wear it.

I decided to pair these two polishes together and do a accent nail manicure. I used two coats of Minted on 4/5 nails and painted my ring finger just with Stunning. It took about 5-6 pretty think coats to get the glitter to look opaque, and it took forever to dry. Even when I thought it was dry it was malleable. It never completely dried in the week that I wore it. The removal of the glitter was easy because it just peeled right off my nail. I think next time I will use Stunning as an overlay over another polish instead of by itself.


Tuesday, May 14, 2013

NOTD: Revlon Popular

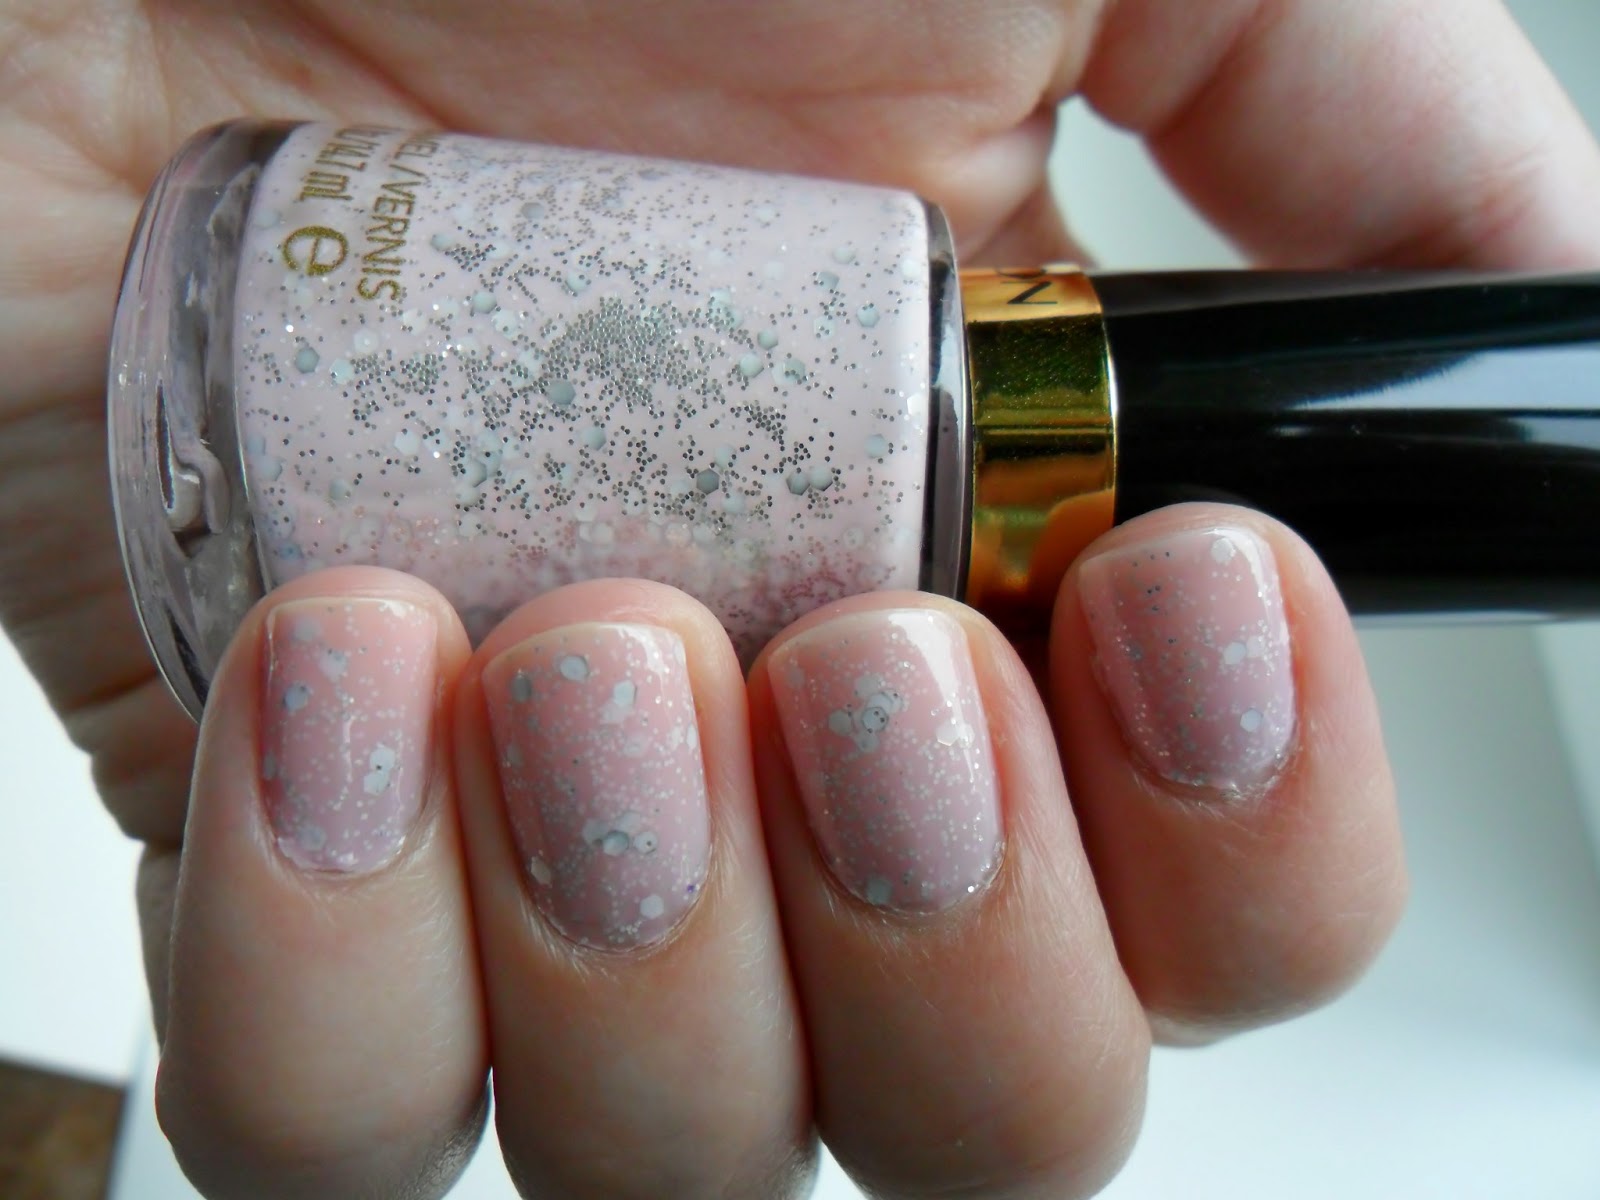
When I first saw Revlon Popular on Sleep and Water I knew I needed to add it to my collection. I searched at Walmart and Shoppers Drug Mart, but all my stores were sold out. To my surprise I found it at Dollarama and quickly snatched it up.

Revlon Popular is a light milky pink base with silver glitter and shimmer in varying sizes. I think it is perfect for work, school, an interview, etc because it is such a neutral colour, but the glitter gives it a little pop of fun.

It takes two coats for this polish to be semi-opaque. I could still see the tips of my nails through it a bit. Next time I wear this polish I will try three coats. The drying time is fairly consistent with other Revlon polishes, and it came off my nails fairly easily. Some of the glitter stuck to the nail and I had to scrape it off, but it wasn't that big of a hassle.


Tuesday, April 2, 2013

Review: BA STAR Smoky Eye Shadow Palettes

Disclaimer - This product was sent to me for review purposes from BA STAR through the website BrandBacker. I am not being compensated for this post. Opinions on this product are 100% honest and my own.

BA STAR offers four different smoky glitter palettes on their website in the colours: Natural, Smoky, Pretty N Pink, and True Blue. I received the Natural palette which is the one I was hoping for. You can see the other three by clicking HERE.
This palette comes with three mineral eye shadows in the colours Bronze, Cocoa, and Nude, as well as, two gel glitters in Gold and Crystal. It also includes a dual ended brush.
The brush is pretty cheap and I will never use it. One side has a sponge applicator and the other has a little brush with plastic bristles. Overall, the quality of this brush is lacking. I don't know why companies even include these.
The glitters are nice, but not practical for everyday wear because of the gel base. But I didn't have high expectations for everyday wear. Because BA STAR creates and markets their makeup for use by cheerleaders and dance teams, these glitters need to stand up to sweat, but are not likely to be worn on the eyes. In my life I would probably only use these on Halloween.

The gold glitter needs a few layers before it is semi opaque. I didn't find that the gold was as pretty out of the pan as it is in the pan. For me, the gel base didn't completely dry and on my eyes would crease fairly quickly. I also really had to scrub to get the glitter off which irritated my skin.
The crystal glitter was super pretty swatched on my hand. This glitter flashes a rainbow of colours, in the right light, and I tried my best to capture that. This would be perfect to use if I was doing a Fairy or Mermaid Halloween look. The downside of these glitters for me is that they irritated my skin. After removing the swatches from my hand I was left with a lovely red rash for the rest of the day. I'm not saying this will happen to everyone. Obviously one of the ingredients does not mesh with my skin.
The eye shadows in this palette far exceeded my expectations! I would not hesitate to purchase all four palettes just for the eye shadows and depot them into a freestyle palette. They were super smooth, and buttery and went on like a dream. The only one I had a problem with was Nude. It was a bit chalky and had a bit of fallout. Bronze and Cocoa were both opaque with one swipe. The colour payoff was amazing! I really think Bronze would look good over Maybelline's Bad to the Bronze cream shadow. I really love the tiny gold barely there glitter in Cocoa, it really adds a nice depth to the shadow. Nude would be great over Maybelline's Barely Branded cream shadow and perfect for an everyday makeup look.
I really love these shadows already and could see myself using them daily. If you would like to try BA STAR's Smoky palettes, or any of their other products, readers of my beauty full adventure will receive 50% off by using code BBSMOKY at the checkout.


Saturday, March 23, 2013

Review: Revlon Nail Art - Moon Candy, Neon, & Expressionist

Disclaimer: I received these nail polishes for free from Revlon Canada. I was not required to write a review in exchange for receiving them.
 
 
Today I will be reviewing 4 of the new Revlon dual-ended Nail Art Nail Polishes. I was first exposed to these nail duos through the Revlon Selects Program. I have since then seen the Shatter Polish Duos at Dollarama and have been thoroughly impressed with them.
 
I was in contact with PR at Revlon Canada about the next Revlon Selects and a few days later, to my surprise, these 4 nail polishes came in the mail. It was such a surprise and it really made my day.
 
The 4 I received were:
Revlon Moon Candy in Satellite
Revlon Neon in Pink Glow
Revlon Moon Candy in Orbit
Revlon Expressionist in Monet Money
 

1) Revlon Nail Art Neon in Pink Glow - This duo comes with a white base coat and a bright neon hot pink. The thought behind this duo is that you paint your nails with one or two coats of the white first and then once it is dry you put one or two coats of the neon polish on top. The white base is what's supposed to really make the pink colour pop.

My Thoughts - I like the concept of this polish. I really like neon polishes for Spring and Summer, and pink is my kind of colour. However, I didn't really like how this applied. The white took a long time to dry and even when I thought that it was, when I put on the pink, the white polish smeared underneath. It was also very hard to get the pink over all the white, as you can see the white peaking out around the edges. This picture also doesn't do this polish justice. It is crazy bright and my camera just couldn't focus on it. I think next time if I took more time to do my nails and let the white base dry, it would look nicer, and I would like it even more!

2)Revlon Nail Art Moon Candy in Orbit - I have reviewed this polish before. You can read that review HERE. The concept of this polish is that you use the dark base and then put the flakie top coat on to create a 3D/Galaxy nail look.

My Thoughts - My second time using this I was a bit more patient. I let the base polish dry longer, and tried to pat the flakes on the nails instead of swiping it on. I still had issues getting a lot of flakes on the nails, because I think that there just isn't enough in the bottle. Also, even with dabbing on the polish the base coat smeared.


3) Revlon Nail Art Expressionist in Monet Money - The concept of this nail polish is that one side has a thin stripping brush so that you can create lines, dots, or other nail art. The duo I received has a mint base with a yellowish stripping colour that has iridescent shimmer.

My Thoughts - This isn't a colour duo I would think to put together, but it looks pretty good. The mint was opaque in two coats and it dried fairly quickly. The yellow colour was very thick and I found that I got either too much polish on the brush or not enough. Since it is not opaque you would need at least two coats, but it is so thick that it takes so long to dry. As you can see in the picture above it went on pretty thick and I didn't really like the final outlook.

4) Revlon Nail Art Moon Candy in Satellite - Like Orbit above this polish is a dark oxblood base with a flakie topcoat. The flakes in this one change from gold, to orange, to green.

My Thoughts - I really liked this polish. The base colour is really nice on its own, and there is a better concentration of flakes in the top coat. I really liked the finished look of this duo and I can see myself using this over and over. This duo works a lot better than Orbit.

I want to thank Kelsey from Revlon Canada's PR team for sending me these polishes! If you would like to keep up with everything to do with Revlon Canada, like their Facebook page HERE.


Have you tried any of these Revlon nail polish duos? If so, what are your thoughts on them?


Thursday, January 17, 2013

NOTD: Powder Blue Mosaic

Today's manicure has got to my most favourite manicure of the past year. I picked up Revlon's Blue Mosaic just before Christmas, and have been trying to figure out a good way to wear it ever since. The multi-sized glitter has a moderate density to it, which would probably take 3 pretty thick coats to get full opacity on the nail.

I was himming and hawing about doing a full glitter manicure or an accent glitter nail manicure, when the idea of a glitter gradient popped into my mind. I started with two coats of Joe Fresh Powder Blue, which is what the name says, a light powder blue colour. I find that Joe isn't that creative with the naming of their polishes lol. Powder Blue has a real watery consistency so two coats took no time to dry and allowed me to add lots of glitter without it taking hours to dry.


To get the glitter gradient I started with a thin layer of glitter over the whole nail. After that was dry I repeated that but started halfway down the nail to the tip. Once that was dry I added a third thicker layer of glitter right to the tip of the nail (as if I was doing a French Manicure). I did a thicker layer for the last one because I wanted the glitter to be almost opaque at the tips. I then used a coat of Seche Vite to lock everything in, and voila! a beautiful blue glitter gradient manicure.

Even with 7 coats of nail polish on each nail it dried fairly quickly, and lasted about a week before it started chipping at the tips. This is definitely a manicure I will be doing again soon.


How do you feel about glitter gradients??


Wednesday, December 12, 2012

Revlon Selects: Nail Art Expressionist & Moon Candy Review

Hey ladies! I am here with my first Revlon Selects Review! A few weeks ago on the Revlon Canada Facebook Page they were looking for fans of their page to sign up to possibly win 1 of 500 prize packs. The prize packs as can be seen above would include 5 brand new products to be tried and reviewed. I was so excited to sign up and possibly be chosen as I am a huge fan of Revlon Products. In the end I was chosen as one of the lucky 500 and I received my package the other day.
 
It seems that everyone got the same colours and although they are all beautiful it would have been nice to see some variation. In this post I am going to be talking about the two nail polishes and file we received and I will review the lipstick and eyeshadow palette in future posts once I have more time to try them out.

The first nail item I received was the Revlon Nail Art Expressionist in Vincent Van Gold. The concept behind this product is that you use the Purple shade on all of your nails and then use the Gold shade to make lines or dots. The gold shade comes with a very thin nail art brush that can be used to do any sort of nail art or detail work.

What I Liked
 - The ease of use. Even someone like me who can't do nail art to save her life can create lines and dots easily and with little to no effort.
- The gold colour is beautiful.  I have nothing like it in my collection and I can see myself painting all of my nails with this shade.
- The size of the nail polish is perfect. It is small enough that you can bring it on the go with you but there is still a ton on product and you will get a lot of manicures before the bottles are empty.
- The colour combination is spot on. The purple polish sometimes looks blue and I think that gold compliments both of these shades well.

What I Didn't Like
- Although I like the colours I have some many purples like this already so it would have been nice to get a colour I didn't have.
- The purple colour needs about 3 coats to match how it looks in the bottle. With three coats it takes such a long time to dry so you have to wait a while before you can use the gold on top.
- When trying to paint stripes with the gold, because of how it is packaged, it is bulky to hold in your hands.

Would I Purchase?
I would re-purchase this product and might look for some other colour combinations.
Here is the purple swatched with 2 very thick coats.

 Here is the gold swatched with 2 coats. I just made a simple striped design to show you how it looks on the nail.
Next I received the Revlon Nail Art Moon Candy polish in the shade Orbit. It comes with a dark purple shade for all over your nails and a flakie top coat. In the bottle the top coat looks slightly pink with flakes that change from gold to pink to a light blue. The concept of this duo is that when the flakie top coat is applied it makes your nails look like galaxy nails.

What I Liked
- This colour combo is totally up my alley. Both shades are beautiful in the bottle and on the nail.
- The colour payoff on the purple is amazing. You only need 1 coat for it to be completely opaque and smooth. No streaks with this polish.
- The flakie top coat can be used over any polish to get a different look.

What I Didn't Like
- The only complaint I really have with this product is that the top coat doesn't have enough flakes in it. I really had to glop on the polish to get any flakes on the nail. I also had to get flakes on the brush and place them on the nail because it was just becoming a total mess. The final result looked good at some angles but when I tried to photograph it it just looks awful. I could not get a good picture.

Would I Purchase?
Probably not. If I want a flakie top coat I would probably pick up one from Essie.
This is 3-4 thick layers swatched. As you can see alone the moon candy half doesn't really look like anything on the nail. And even with 4 coats there are barely any flakes on the nail.
This is 2 coats of the purple shade swatched. It is such a pretty colour by itself and I will probably use it by itself in the future.
Believe it or not this is the best picture I could get of the duo used together. It was just a mess. The flakes are uneven and lot of them wouldn't lie flat so the end result was bumpy and gross. You really can't see the effects of the flakes but even in person I couldn't see it either.

 
 Lastly, in the nail category I received a Diamond Collection Nail File. I was so happy that I received a purple one as purple is my favourite colour. This file has a normal file looking side and a purple glittery side. I don't normally use files so I can't give a really in depth review, but it is pretty hard to mess up a file so I am sure this works great. If/When I try this out if I am majorly impressed or unimpressed I will write another little review.
 
 
All-in-all what I used so far has been pretty good. I want to thank Revlon for choosing me as a Revlon Select and I hope to be chosen again if they do this again in the future.
 
If you received a Revlon Selects box what did you think of the polishes?


*Disclaimer - One or more of the products in this review were sent to me for review purposes. I am in no way affiliated with any company mentioned and I am not being paid for this review. All opinions are 100% my own and are not influenced in anyway.